Docker is a containerization product that lets you run programs in an isolated environment. It’s like a mini virtual machine. Our multi-platform container is available on Docker Hub. It’s available for AMD64, ARM64, and ARM32 Linux architectures. WSL2 is the Windows Subsystem for Linux, available on almost all Windows distributions. We will use it and Docker to enable subnet routing, which then allows you to securely access your home network from anywhere using the Nettica VPN Service, for free.

Introduction
We’re not going to lie, this tutorial is rated as hard. If you can complete it, then you’re Nettica material. Make sure your systems are fully up-to-date before you begin. The instructions are clear and concise, but familiarity with the Windows command prompt and Linux terminals is a big plus. This tutorial assumes you have a Windows desktop, a laptop, and a phone you can tether to your laptop.
Install the Windows Subsystem for Linux
First let’s install the Windows Subsystem for Linux, or WSL2. From the Windows search bar, type “Features” and then click on the result “Turn Windows Features on or off”
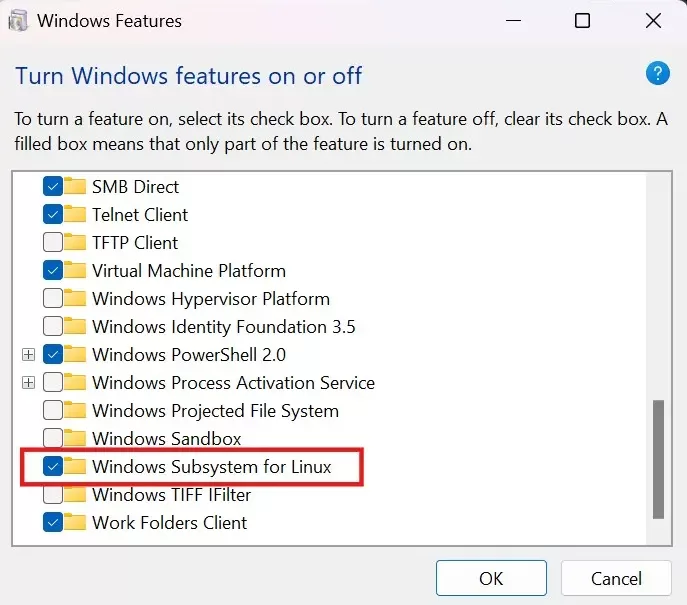
Check the box and then click OK to install the Windows Subsystem for Linux. You will need to reboot after it’s done.
Next, open the Microsoft Store application and then search for “WSL2” using its search bar.
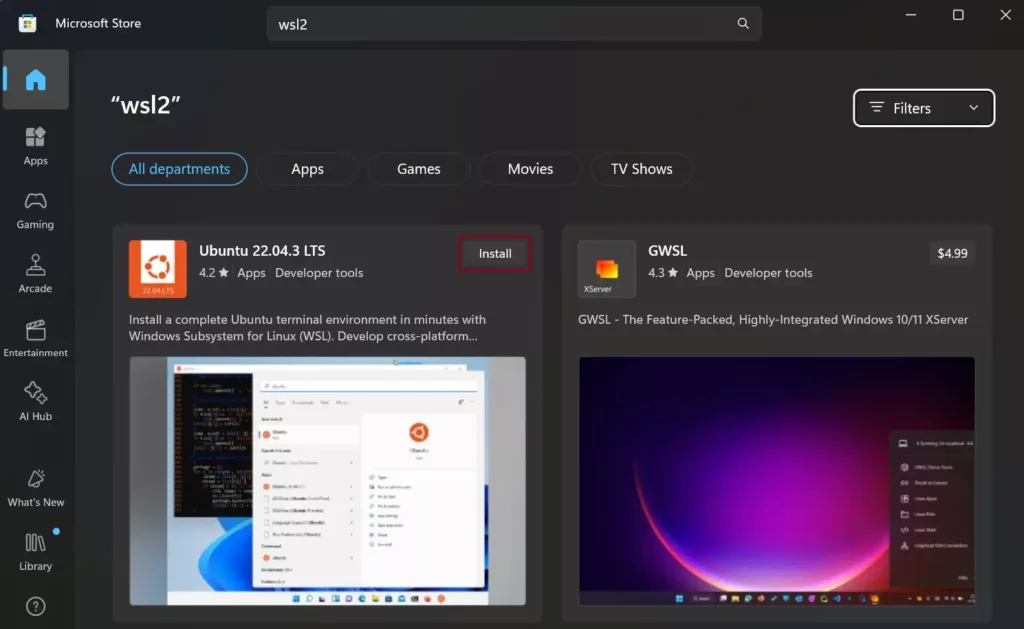
Install Ubuntu 22.04 LTS. After it’s installed type “ubuntu” into the Windows search bar and start it up.

It takes a few minutes to load initially. You will need to supply a username and password for your Linux VM.
Install Docker
Docker has excellent installation references on the web. We recommend Docker Desktop on Windows and your main package manager for Linux. On Windows, you’ll be happy to know it installs everywhere that WSL2 installs, which includes Windows Home Edition. That means you can run a docker container on practically any machine. We will use this to set up subnet routing for your home network. Note that for Linux distributions there are a lot of Docker “clones”; we only recommend the official Docker product.
Today however we will install Docker independent of Docker Desktop. If you have Docker Desktop already installed exit the program to avoid any problems. It will minimize to the SysTray so be sure it has closed. Follow the instructions here for installing Docker on Ubuntu. The reason for this is to get the actual host network interfaces, and not the sandboxed ones from Docker Desktop.
Install Nettica Agent
Go to your Ubuntu terminal window, then copy and paste these commands:
sudo apt install curl -y
sudo curl -s -o /etc/apt/sources.list.d/nettica.list https://ppa.nettica.com/nettica.list
curl https://ppa.nettica.com/nettica.gpg | sudo gpg -o /usr/share/keyrings/nettica.gpg --dearmor --batch --yes
sudo apt update

# Install wireguard if not already installed
sudo apt install wireguard iptables -y

# Install nettica-client
sudo apt install nettica-client -y

# Enable IP forwarding for subnet routing or VPN tunneling
sudo sed -i "s/#net.ipv4.ip_forward=1/net.ipv4.ip_forward=1/g" /etc/sysctl.conf
sudo sed -i "s/#net.ipv6.conf.all.forwarding=1/net.ipv6.conf.all.forwarding=1/g" /etc/sysctl.conf
# reload sysctl
sudo sysctl -p
This installs the Nettica Agent (client) onto your VM.
sudo apt install resolvconf -y
# append the original dns settings to the end of the file
sudo ln -sf /etc/resolvconf/resolv.conf.d/original /etc/resolvconf/resolv.conf.d/tail
# update the /etc/resolv.conf file using resolvconf
sudo resolvconf -u
This fixes your DNS to work properly with WireGuard. It is separated out because there’s a chance it will break your WSL2 DNS. If it does, then manually edit it with nano /etc/resolv.conf and add nameserver 9.9.9.9 to restore functionality. To save the file: Ctrl-X, the letter “Y”, and then hit enter.
Configure Linux to use Mirrored Adapter
Continuing, enter sudo nano /etc/wsl.conf and then paste the lines below into it:
[boot]
systemd=true
[network]
hostname = example.linux
generateResolvConf = false
You can enter what you want for a hostname, and then save the file.
Finally, open a command prompt in Windows and edit the file .wslconfig from your home directory.
[wsl2]
networkingMode=mirrored
If you used notepad to create the file, then it added .txt to the end of it. Type rename .wslconfig.txt .wslconfig into the command prompt to fix it.
Restart WSL2 by entering wsl.exe --shutdown into the Windows command prompt. Then start WSL2 again by pressing enter in the Ubuntu terminal window. If it doesn’t start, then close the terminal window and open a new Ubuntu window.
You now have a mirrored network environment spanning Windows, WSL2, and Docker. They will all share the same IP address and ports.
Configure Nettica
Create a New Device on Nettica
Log in to the Nettica Admin. We recommend you use your Google or Microsoft account so you have one less password to remember. After logging in, click “Devices” and then click “Add Device”.
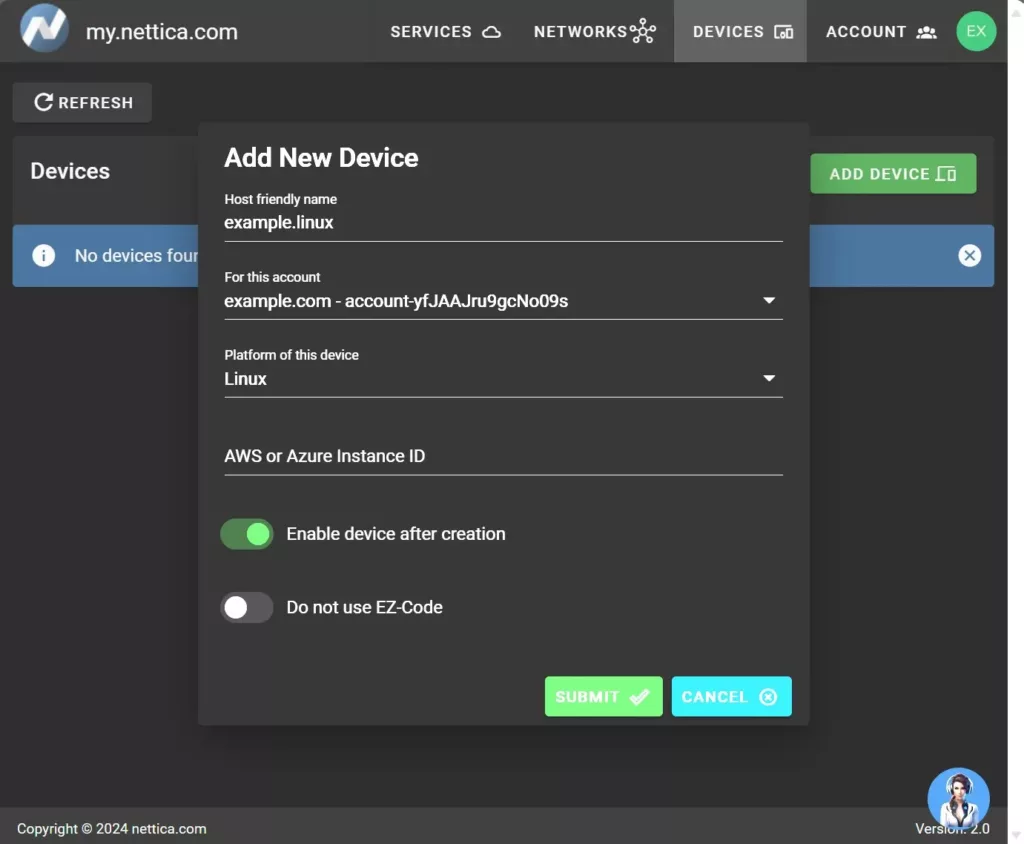
Name your device. Above we named it example.linux. This device is for our WSL2 Nettica Agent. Repeat the process and create another new device for the Docker container. We recommend you name it with a .docker extension to avoid confusion.
If you don’t already have a network with Nettica, click on the Networks tab, and then click on the blue banner to create your first network.
Configure Devices
Configure WSL2
In an administrative Windows command prompt type: net stop nettica. Then in an Ubuntu terminal window type: sudo systemctl restart nettica. Finally, in the Windows command prompt restart the service with: net start nettica. The reason for this is that with a mirrored network, if you send the curl command without restarting the service, then it would reconfigure the Windows Nettica Agent instead of the Linux Nettica Agent. Windows Professional users can avoid this by configuring WSL2 with bridged mode networking instead of mirrored. However, that option is not easily available to Home users.
Select the Linux device from your device list, then click “Copy” in the right-hand pane. Paste the results into your Ubuntu terminal window. If you click refresh a few times using the button on the page then you will see its icon turn green, showing the connection has been established.
Configure Docker
We’re going to create a little script to launch your docker container. In your Ubuntu terminal enter nano start_docker.sh from your home directory and paste the following:
sudo docker pull nettica/nettica-client:latest

SERVER=https://my.nettica.com
DEVICE=
APIKEY=

sudo docker run --rm -d --net=host --cap-add NET_ADMIN --cap-add SYS_MODULE -e NETTICA_SERVER=${SERVER} -e NETTICA_DEVICE_ID=${DEVICE} -e NETTICA_API_KEY=${APIKEY} nettica/nettica-client
Next, select the Docker device from your device list. Then in the right-hand pane copy and paste the Device ID and API Key into the editor in the Ubuntu terminal. You’ll need to unhide the key to copy it.
When you are done, type Ctrl-X, the letter “Y”, and then enter to save and exit nano. Next, enter chmod +x start_docker.sh to make the script executable in Linux. Finally, enter ./start_docker.sh to launch the container.
Configure Subnet Routing
Both the Ubuntu VM and the Docker container are capable of subnet routing. If you add them both to your network configuration, then only one can be used at a time. This is because the script above makes Docker use the host’s network and there would be a duplicate interface name between the Linux host and Docker container. There is an easy solution for this: create a second network and put the docker container (or Linux, you choose) in it instead.
To configure subnet routing, first add the device to a network by clicking the blue plus sign in the middle of the page. Pick the network and then click “Submit”.
Next, expand the device in the left-hand pane and then select the network you added. In the right-hand pane, click “Edit”.
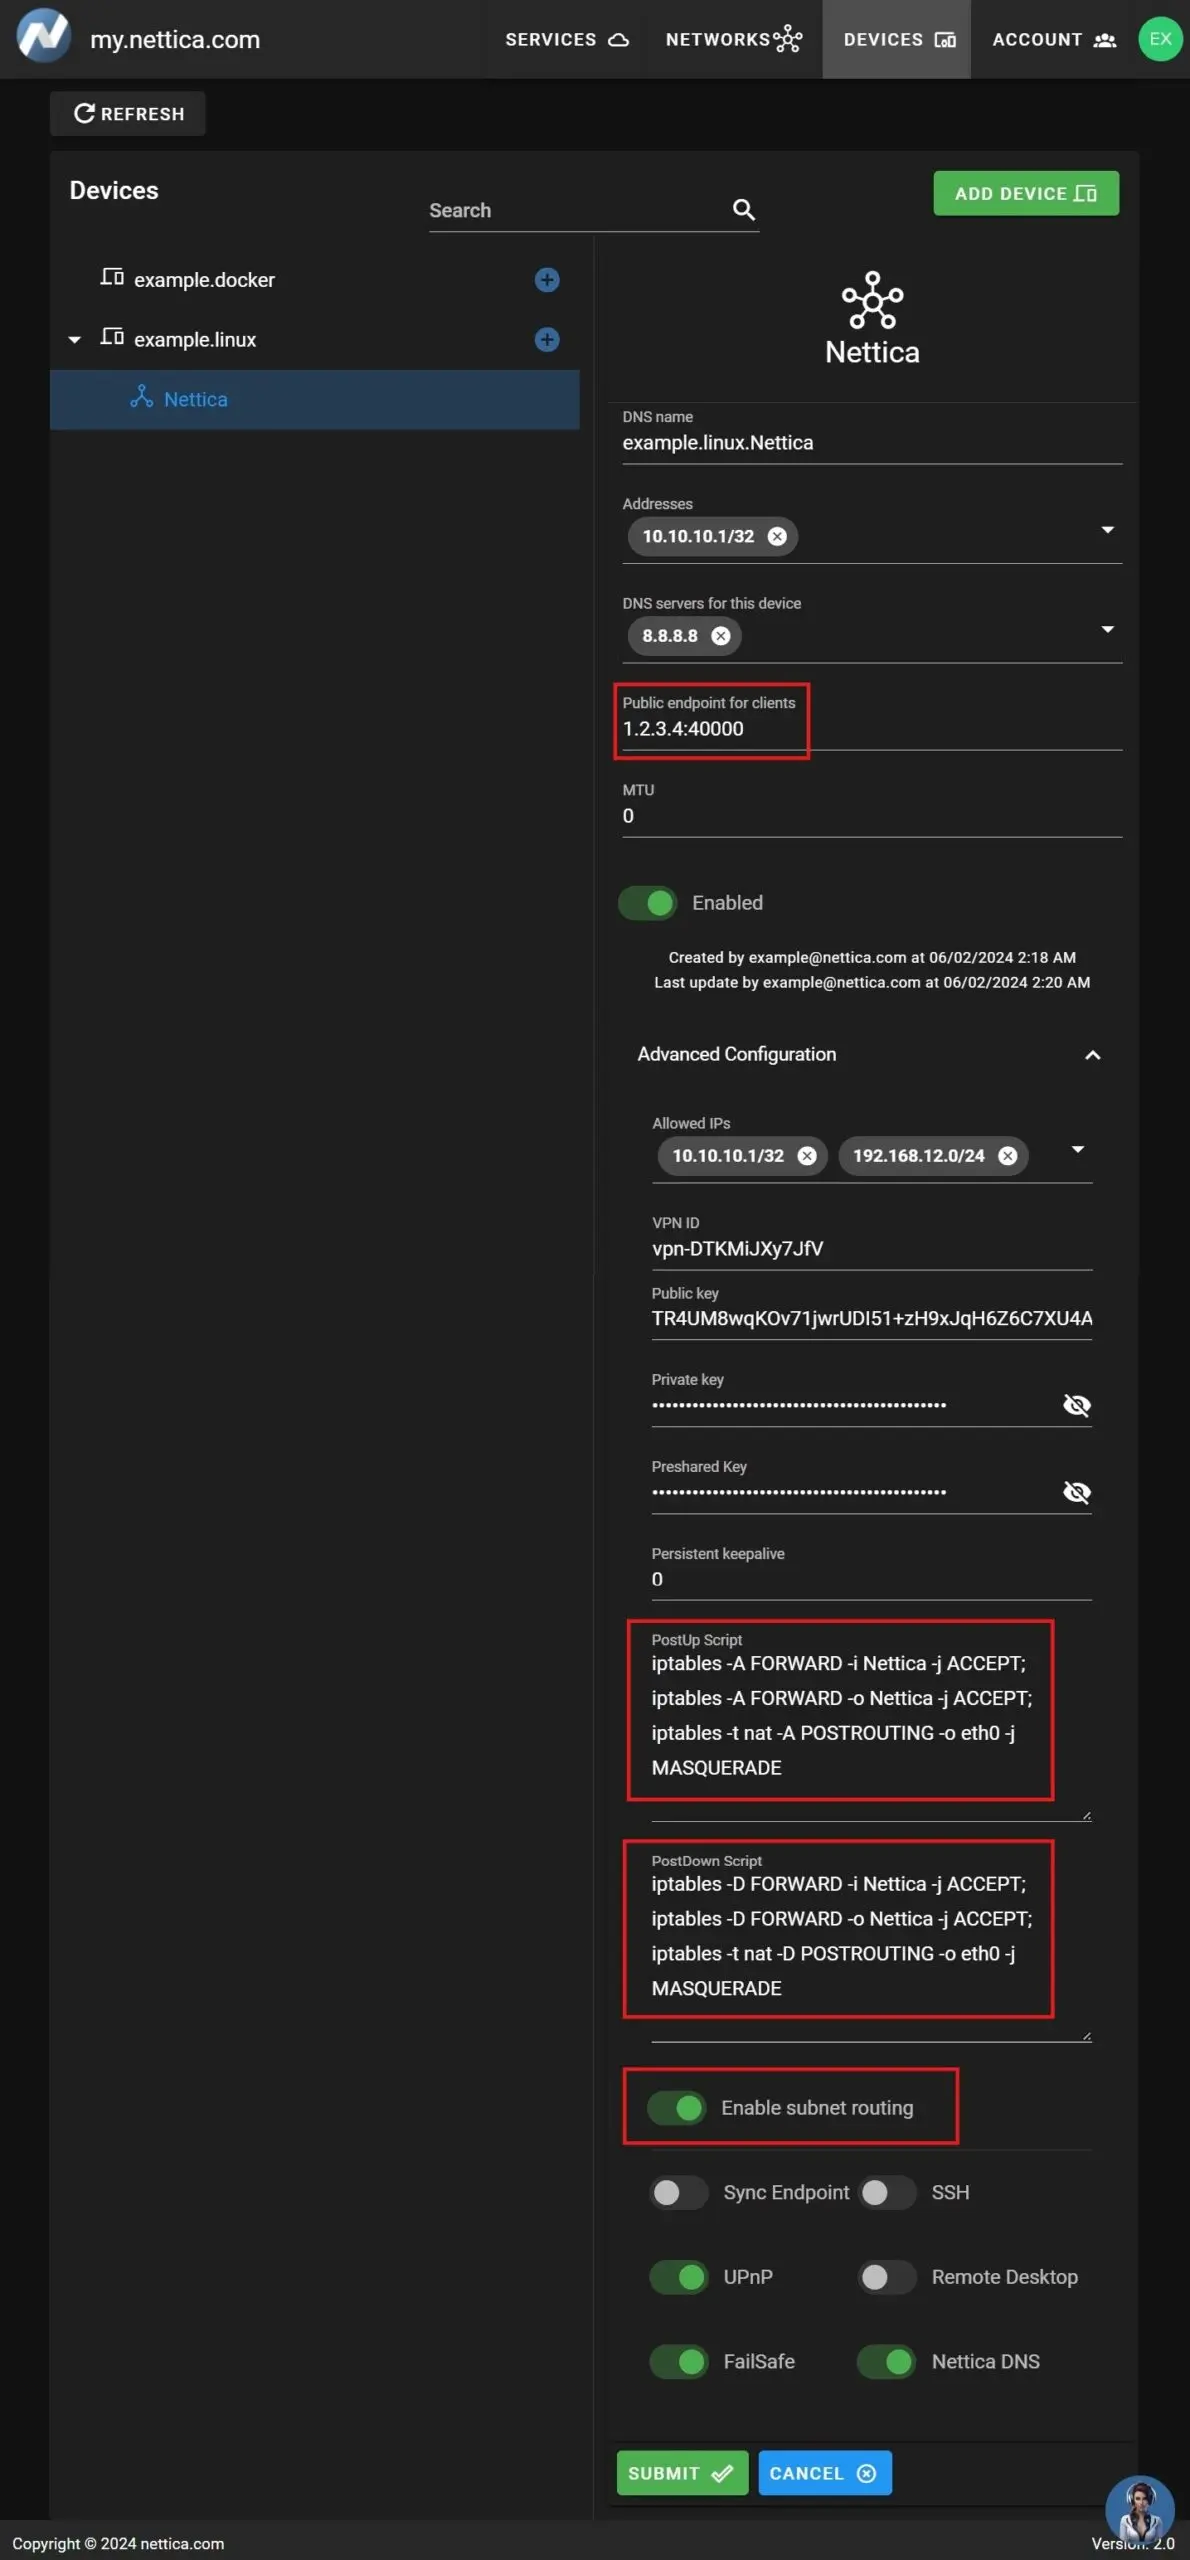
Enter the public endpoint as shown above. Note that if you are configuring the docker container, it must use the PORT specified in the startup script, 30000 in our example. The two devices must be listening on different ports.
Clicking on “Advanced Configuration” expands the section. Enter the subnet you are interested in routing into Allowed IPs. In the example above it is 192.168.12.0/24. Yours is likely different. Then toggle “Enable subnet routing” and the other features you’re interested in. Click Submit, then click “Edit” again and you will see the PostUp and PostDown scripts have been created automatically and should be correct for both WSL2 and Docker. You can check this with ifconfig and verifying eth0 is pointing to your local IP address. Adjust the PostUp/PostDown if needed. You’ll also see your public endpoint update to your external IP address by hitting the refresh button a few times.
Relay Service
It takes a few moments for UPnP to update your external IP address. However, if it doesn’t work after a minute, then you likely don’t have UPnP enabled on your Internet Gateway and you will need to manually configure port forwarding in your gateway. If this is expected, edit the VPN again and then toggle on “Sync Endpoint”, which updates the IP address automatically from our servers (but doesn’t handle port forwarding).
However, if you don’t have UPnP on your gateway or can’t configure port forwarding, your ISP is likely a telephone carrier and you’re behind a carrier-grade NAT. If this is the case, then our Relay Service is for you. It solves this, or any other connectivity problem. Just add it to the network you’re currently working on, and then set its Allowed IPs to include your home subnet. You don’t even need to worry about the firewall. If you go this route, then be sure and clear the public endpoint field for your devices; they are no longer necessary as the relay is your public endpoint.
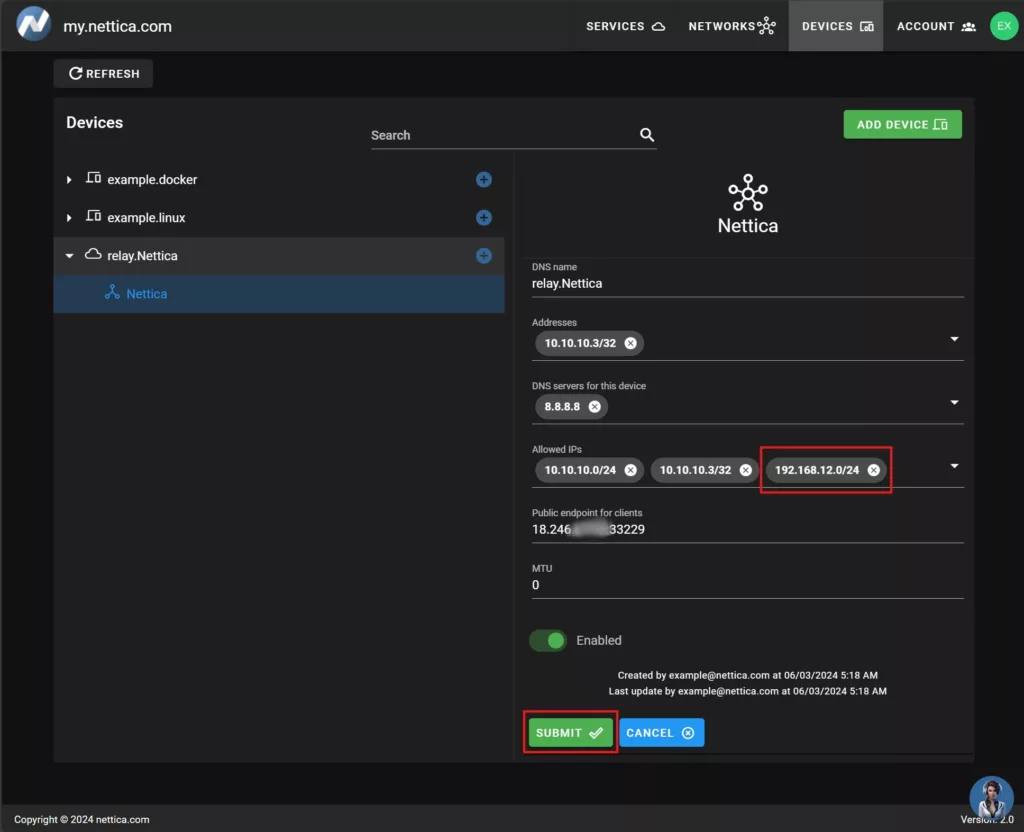
Firewall
Next you’ll need to open the Windows firewall for the ports you configured. From the Windows search bar type “wf” and then open “Windows Defender Firewall with Advanced Security”.
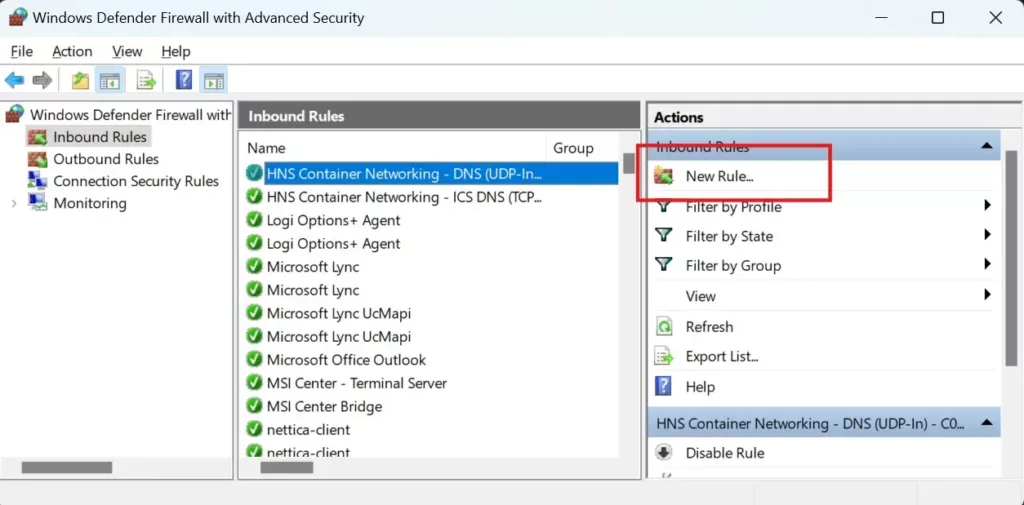
Click “New Rule…” This will launch a wizard to configure your rule.
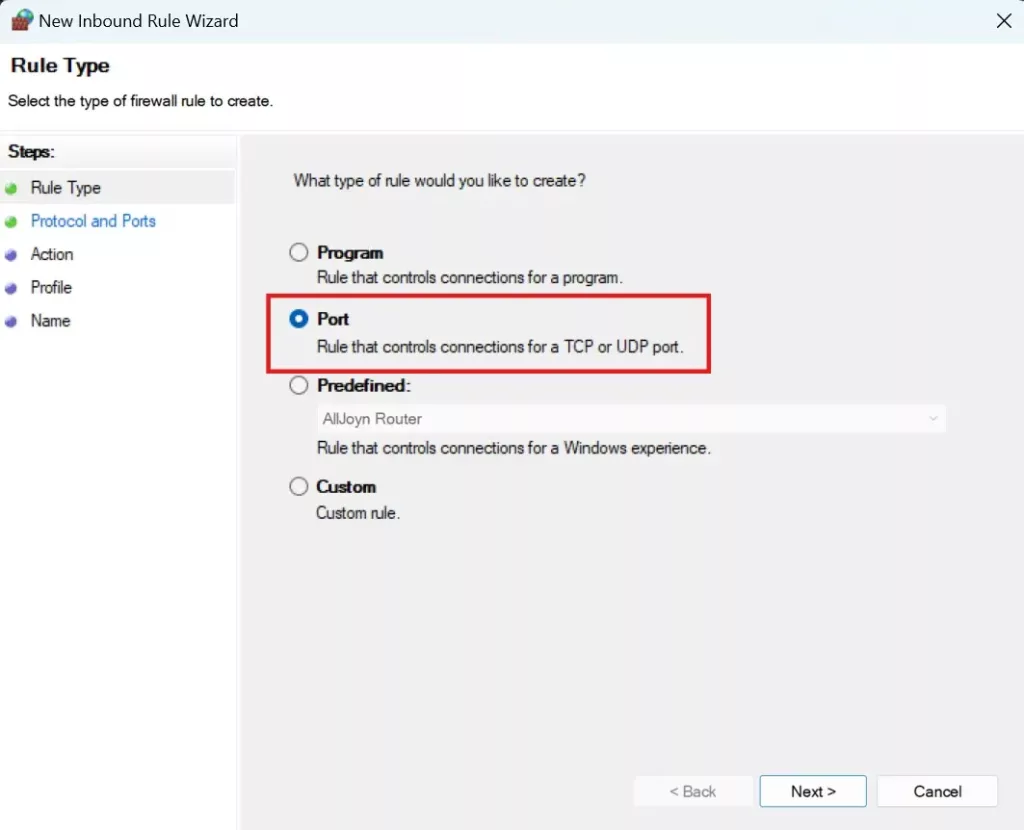
Choose Port and then click “Next”.
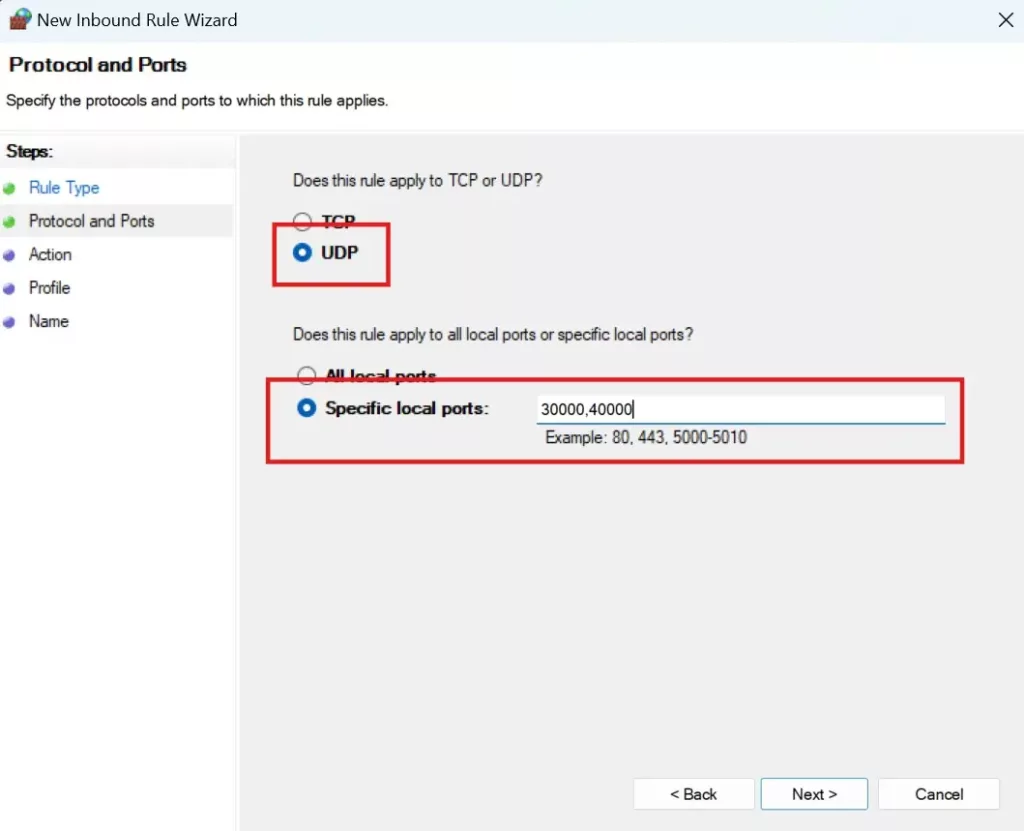
Select UDP for the protocol and then fill in the local ports to allow. Click “Next”.
On the wizard’s next page, ensure “Allow Connection” is selected and then click “Next”.
The next page asks which profiles this rule applies to. Ensure they are all checked and then click “Next”.
Finally, give your rule a descriptive name and click “Finish”.
If you have a different firewall product installed then consult their documentation for setting up a port-based firewall rule.
Configure Hyper-V Firewall Rule
There is an additional firewall protecting Linux instances. Open a Powershell administrative command prompt: type “powershell” into the Windows search bar, and then click “Run as Administrator” in the right-hand pane. Paste the following into it:
New-NetFirewallHyperVRule -Name "Nettica" -DisplayName "Nettica ports 30000,40000" -Direction Inbound -VMCreatorId '{40E0AC32-46A5-438A-A0B2-2B479E8F2E90}' -Protocol UDP -LocalPorts 30000,40000You’ve now successfully configured the firewall and completed configuring your system with WSL2, Docker, and Nettica for subnet routing. It’s time to test it.
Testing WSL2 and Docker
You’ve now completed the setup for inbound connectivity to your home network, with access to the entire network through docker and the Windows Subsystem for Linux.
Install the Nettica Agent on your laptop using our getting started guide, and then tether it to your phone rather than your home network. Open a Windows command prompt and type ping 10.10.10.1, which is a VPN IP address we assigned earlier for the VM or container. Next try 10.10.10.2. The active VPN should respond immediately, which means it’s working properly. If not, then disable your firewall (on your server) and try again. Re-enable it and ensure that ICMP ping is enabled for all profiles.
As of this writing, we’re using experimental code just about everywhere. Windows Docker Desktop’s host mode networking is beta and only supports TCP and UDP, which means we cannot ping our default gateway as the next test. However, there’s a good chance you can curl it or open your browser and go to it if it exposes a web interface, which most do. It appears you can ping the local IP of the host (desktop) computer.
Update: After running through this tutorial a second time, we were able to ping the default gateway. Your mileage may vary!
Conclusion
Whew! That was a lot of work! We installed WSL2 and Docker, downloaded containers, configured them for subnet routing, created a VPN on Nettica, and then opened the firewall to allow connectivity. Even a guru probably learned something along the way.
But if you have any problems with this tutorial, then please do not hesitate to contact our support. We’re more than ready to help you get connected.
Related Reading
Make a VPN with a Raspberry Pi and WireGuard
How to Configure Remote Desktop with a VPN
