Windows
Start or Stop WireGuard Tunnel on Windows
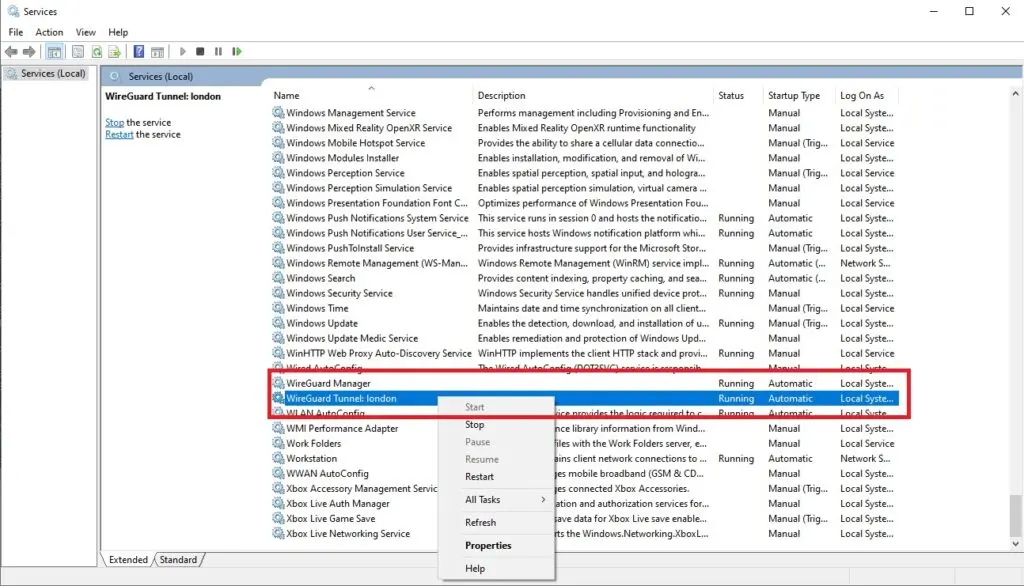
To start a WireGuard tunnel, go to the start menu and type services.msc. Click “Yes” to any security warning. Scroll down to the bottom to see the available WireGuard tunnels. Right-click and select Start or Stop, as appropriate.

To manually start or stop the service from an administrative command line, enter:
C:\>net stop WireGuardTunnel$london
The WireGuard Tunnel: london service is stopping.
The WireGuard Tunnel: london service was stopped successfully.

C:\>net start WireGuardTunnel$london
The WireGuard Tunnel: london service is starting..
The WireGuard Tunnel: london service was started successfully.
Install or Remove a WireGuard Tunnel on Windows
From an Administrative command prompt, enter the following:
C:\>wireguard /installtunnelservice {full-path-to-config-file}\{interface}.conf

C:\>wireguard /uninstalltunnelservice {interface}
No text is returned for successfully installing or removing the service.
Disable or Enable Auto Start
From an Administrative command prompt, enter the following:
C:\>sc config WireGuardTunnel$london start=demand
[SC] ChangeServiceConfig SUCCESS

C:\>sc config WireGuardTunnel$london start=auto
[SC] ChangeServiceConfig SUCCESS
The first command sets the service to manual. The second changes to it automatically start. Neither command changes the state of the running service (or starts it).
Enable PostUp on Windows
Use regedit.exe and create the key HKEY_LOCAL_MACHINE\Software\WireGuard\DangerousScriptExecution as a DWORD(1). You will need to restart WireGuard after making this change. This change enables all script execution: PreUp, PostUp, PreDown, PostDown.
Linux
Installing
# Install wireguard and resolvconf (for dns to work properly)
# Install iptables (optional)
sudo apt install wireguard resolvconf iptables
Starting and Stopping WireGuard Tunnel on Linux
sudo wg-quick up {interface}

sudo wg-quick down {interface}
Enabling WireGuard on Startup with systemd
sudo systemctl enable wg-quick@{interface}.service
sudo systemctl start wg-quick@{interface}.service
Disabling WireGuard on Startup with systemd
sudo systemctl stop wg-quick@{interface}.service
sudo systemctl disable wg-quick@{interface}.service
Subnet Routing
PostUp=iptables -A FORWARD -i wg0 -j ACCEPT; iptables -A FORWARD -o wg0 -j ACCEPT; iptables -t nat -A POSTROUTING -o eth0 -j MASQUERADE
PostDown=iptables -D FORWARD -i wg0 -j ACCEPT; iptables -D FORWARD -o wg0 -j ACCEPT; iptables -t nat -D POSTROUTING -o eth0 -j MASQUERADE
Also, be sure to configure the AllowedIPs for the host doing the routing on each client, specifying the subnet being routed, for example, 10.0.0.0/24. Subnet routing is defined through AllowedIPs; the PostUp and PostDown provide a NAT to avoid making routing changes (outside of WireGuard) on the destination network.
Pro Tip: If your WireGuard configuration isn’t working and you added[Peer] PublicKey = +xISS... PresharedKey = HdMrT... Endpoint = 18.xx.yy.zz:ppppp AllowedIPs = 10.0.0.1/32, 10.0.0.0/2410.0.0.1/24as your IP address, that is the problem. Change it to10.0.0.1or10.0.0.1/32. Using a configuration as shown above makes configuration between peers consistent. The “relay” at 10.0.0.1 should only have AllowedIPs with single IP addresses in it.
Guru Tip: If your WireGuard configuration isn’t working and you added two endpoints, say the IPv4 and IPv6 addresses for the same endpoint, that breaks the Go version of WireGuard (usually used by mobile apps), which can only handle one endpoint per peer. If that’s the case, create a second .config file for the second peer, or if using Nettica, a second network.
Bridging
PostUp=iptables -A FORWARD -i wlan0 -o korea -j ACCEPT; iptables -A FORWARD -i  korea -o wlan0 -m state --state RELATED,ESTABLISHED -j ACCEPT; iptables -t nat -A POSTROUTING -o korea -j MASQUERADE
PostDown=iptables -A FORWARD -i wlan0 -o korea -j ACCEPT; iptables -A FORWARD -i korea -o wlan0 -m state --state RELATED,ESTABLISHED -j ACCEPT; iptables -t nat -A  POSTROUTING -o korea -j MASQUERADE
On each client, add 0.0.0.0/0 to the AllowedIPs for the bridge host.
Statistics
wg
These commands apply to both Windows and Linux
wg

wg show all transfer
wg show {interface} transfer
wg show all dump
Related Reading
Use Docker & WSL2 to access your home network with WireGuard
Easily Create a VPN with a Raspberry PI and WireGuard
